
Settings in the Moodle Course
The lecturer role in Moodle allows you to adjust various settings in the Moodle course and to design the content of the course.
How settings can be edited differs depending on the Moodle theme (see screenshots below).
On the other hand, adding activities or material is the same for all Moodle themes (see quick access for Moodle).
Quick access for Moodle
⬛️ Turn on editing (top right button)
➕ Create activity or add material
⚙️ Edit settings
✏️ Edit title via pencil icon
✢ Move elements using arrow cross icon


Select suitable course format
e.g. grid format, topics format, weekly format
Course administration -> "Edit settings" -> "Course format"

Grid format
Presentation of modules in tiles
Advantage: direct overview of all sections of the course
Disadvantage: Section opens as pop-up, images required for tiles
")
Topics format
all contents on one page
Advantage: no extra pop-up opens
Disadvantage: not all sections at a glance (scrolling required)
")
Weekly format
all contents on one page
Advantage: no extra pop-up opens, sorted by weeks
Disadvantage: not all sections at a glance (scrolling required)
")
Set the desired theme
e.g. Boost, Classic, Adaptable
Course administration -> "Edit settings" -> "Appearance"

Boost
Classic
")
Creating the structure of a Moodle course
Use the service area and lesson area for orientation
Service area
Greeting as text, video or audio track (customise label)
Image
Contact details
Overarching learning objectives
Information about the course structure
Communication channels (forums, chat ...)
Indication of consultation hours
If applicable and consistent throughout the semester, course room
Lesson area
Learning objectives
Input, material
Descriptions
Tasks for the week with approximate times
Literature
If applicable, knowledge test
If applicable, coloured bars for orientation (use HTML codes)


Tips for teaching
Create learning objectives & introductory text
Indicate approximate workload in minutes (behind each activity to support predictability for students).
Add descriptions and check “Display description on course page".
Embed images, videos or H5P applications in a text field
Hide course content that is not yet relevant (whole topic or individual content)
Settings -> Course format -> completely invisibleUse participant view to check course view for students
Profile picture -> Switch role to... -> Participant (Teilnehmer/in)
Profile picture -> Back to my normal roleUse highlighting, e.g. coloured dividers for each text field or section highlighting in Moodle
Use Moodle group mode (as needed)
e.g. for seminar groups (groupings) or for group work in a seminar (groups)
Course Administration -> Users -> Groups -> Auto-create groups
Groups and groupings
In Moodle, students can be divided into groups and groupings. This has the advantage that activities and materials can be used differently by individual groups.
This makes it possible to combine courses with similar content that were previously divided into three or more course environments (e.g. for each seminar group) into one Moodle course and additionally create areas for group work.
Conclusion: the group mode makes it easier to differentiate in terms of content and methods in Moodle.
There are three group modes in Moodle:
No groups: there are no groups in the course, each course member belongs to the overall group.
Separate groups: each group is only able to see the members of its own group. The other groups (and their activities, e.g. forum posts or wiki entries) are invisible.
Visible groups: each group works for itself, but sees the members of the other groups (and their activities, but with read-only access).
When should I use groups?
Example: for group work as part of a seminar.
Groups are suitable, for example, if you would like students to discuss, exchange or work together in small groups.
Internal group discussion forum
Internal group etherpad for collecting ideas
Internal group wiki
When should I use groupings?
Example: I can use groupings to differentiate the content and students for a seminar I am teaching to parallel groups (seminar group 1 and seminar group 2).
Groupings, in turn, make it easy to provide certain groups with materials and activities that other groups should not have access to.


Define enrolment methods
e.g. manual enrolment, self-enrolment
Course administration -> Users -> Enrolment methods
The "Edit" column makes it possible to enable or disable the enrolment methods (eye symbol) and edit the settings.
e.g. to protect self-enrolment with a password
Examples:
You can enrol colleagues and assistants manually.
Enrolment methods -> Manual enrolments -> Enrol users -> [new window] search for names in the search field of the “Not enrolled users" section -> Assign course role (lecturer) -> Add
URZ manual enrolment guide
Self-enrolment is usually used for students. You store a key in the Moodle course settings and communicate it to your students, e.g. via the self-service portal (HIS). They can then enrol in the Moodle course independently.
URZ self-enrolment guide
URZ instructions for deleting participants from course


Manage roles and rights
e.g. to give someone lecturer rights
Participants -> Roles: Pencil symbol -> Select role -> Save
Select "Participants" (or in the block "Course administration" in the section "Users" select the option "Enrolled users")
The column "Roles" is usually set to "Participant" by default. To the right of it is (easy to miss) a pencil icon. Click on the pencil and in the drop-down menu click on the corresponding role - for us this is "Lecturer” (Dozent/in).
Don't forget to save

Video tutorial: How to change or add the role of participants? [02:09 min]
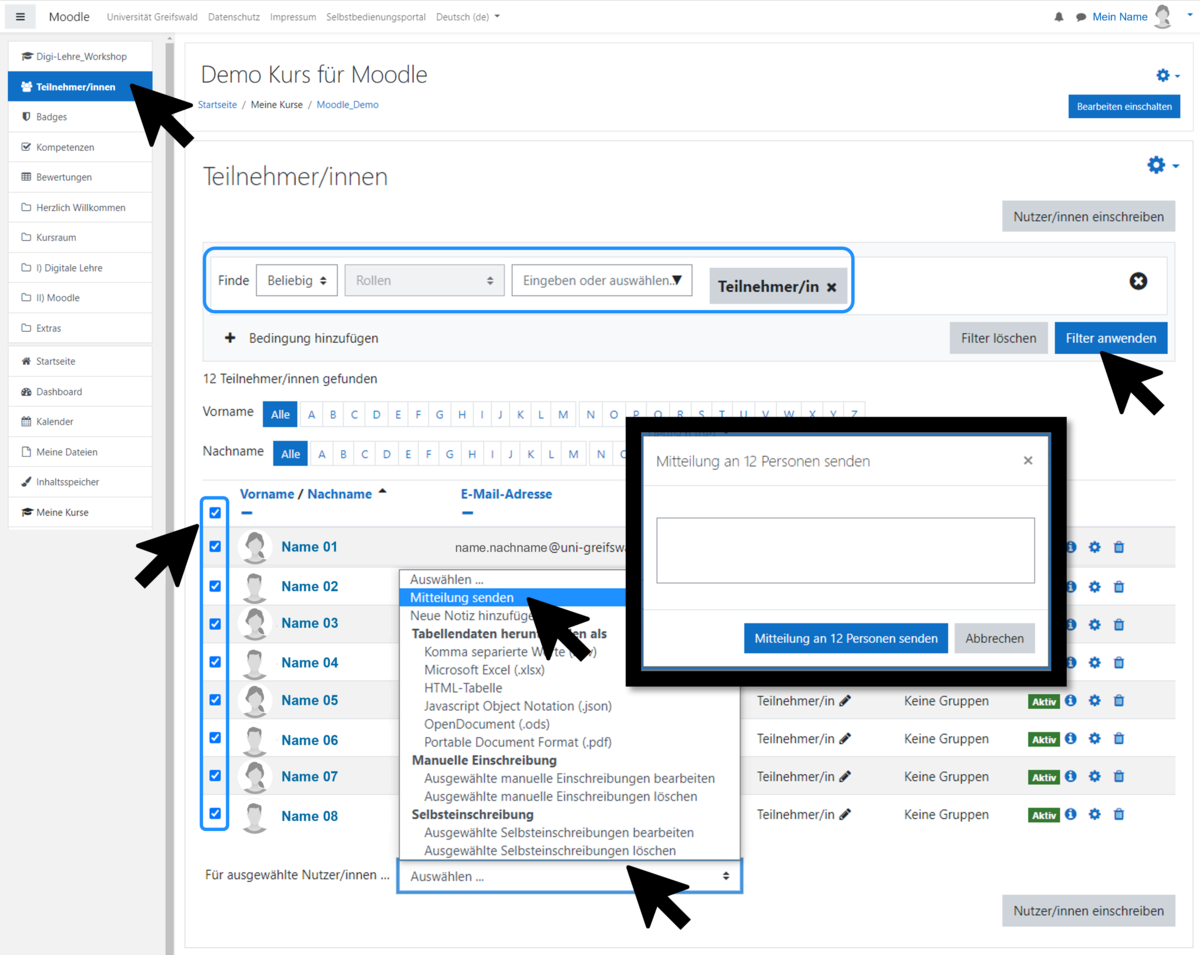
Send notification to students via Moodle course
Example: send a message to all course participants
Select "Participants”
Filter by "Participant" and check all boxes
Select "Send a message" in the drop-down menu
Enter and send the message
Moodle basics explained in video tutorials
Video tutorial #1: which course formats are available in Moodle? [03:37 min]
Video tutorial #2: which designs does Moodle offer & how do I create materials/activities? [01:41 min]
Video tutorial #3: how can I change or add the role of participants? [02:09 min]